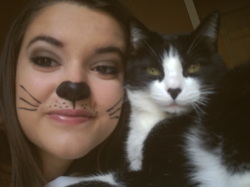
- This is going to be (as you can see) a cat makeup tutorial because some of you requested it so here it comes I hope you will enjoy it ! :) (You can click on the photos to see with more precision)


1. So I first applied my foundation (Rimmel match perfection) concealer (Mac studio concealer and benefit's erase paste under neath my eyes) and mattifying powder (Urban Decay's) and I did my brows (using realtchniques brow brush and a random mat brown eye shadow).
2. I applied virgin from the naked palette all over my lid as well as under neath my brow but everywhere not just as a highlighter.
3. I applied a brown eye shadow from the sleek palette "Storm", I blended buck from the naked palette a bit on my crease and I applied a bit of the same brown eye shadow under neath my water line.


4. I took Maybelline's gel liner (in black) that I put on my water line.
5. I took that same gel liner that I applied on and did a little wing at the end to give it an even more cat eye effect.
6. Last but not least I applied Benefit's they're real mascara, you could wear on fake lashes that would actually be even better but I didn't find the kind of "feline" lashes I wanted.


7. I started the real cat stuff, I began with the nose I started by doing the heart shape of a cat's nose with Maybelline's gel liner and realtechniques pixel point eye liner brush then I filled it in with the gel liner.
8. I did the line relating the nose to the mouth still with Maybelline's gel liner and realtechniques pixel point eye liner brush (I did everything with those two basically)
9. I did the whiskers and the little points above my mouth (I don't really know how they're named...)
8. I did the line relating the nose to the mouth still with Maybelline's gel liner and realtechniques pixel point eye liner brush (I did everything with those two basically)
9. I did the whiskers and the little points above my mouth (I don't really know how they're named...)


10. Then you could just leave it that way wear on a nude lipstick and that's it, that would look nice, but I decided to do the entire thing.
11. So I drew the shape of my mouth in a more accentuated way (more smiling) and I filled it in still using realtechniques pixel point liner brush and Maybelline's gel liner.
12. And finally because I forgot to do it sooner (I always forget something) I contoured my face a bit (with a realtechniques blush brush and sleek contour kit) because cats have a really structural face.


There you go for the Halloween cat makeup and if you want to do a cat nail art to go with you can click on the button below, thank you so much for reading me and if you have any questions/requests put it on the comment below or send us an email at [email protected] ! Hope you enjoyed !
